PCA BOW & ARROW SETUP / TUNING GUIDE.
COMPOUND BOW SETUP.
STEP #1 : KNOWING THE SPECS TO YOUR BOW; WHAT THEY MEAN; AND HOW TO CHECK THEM.
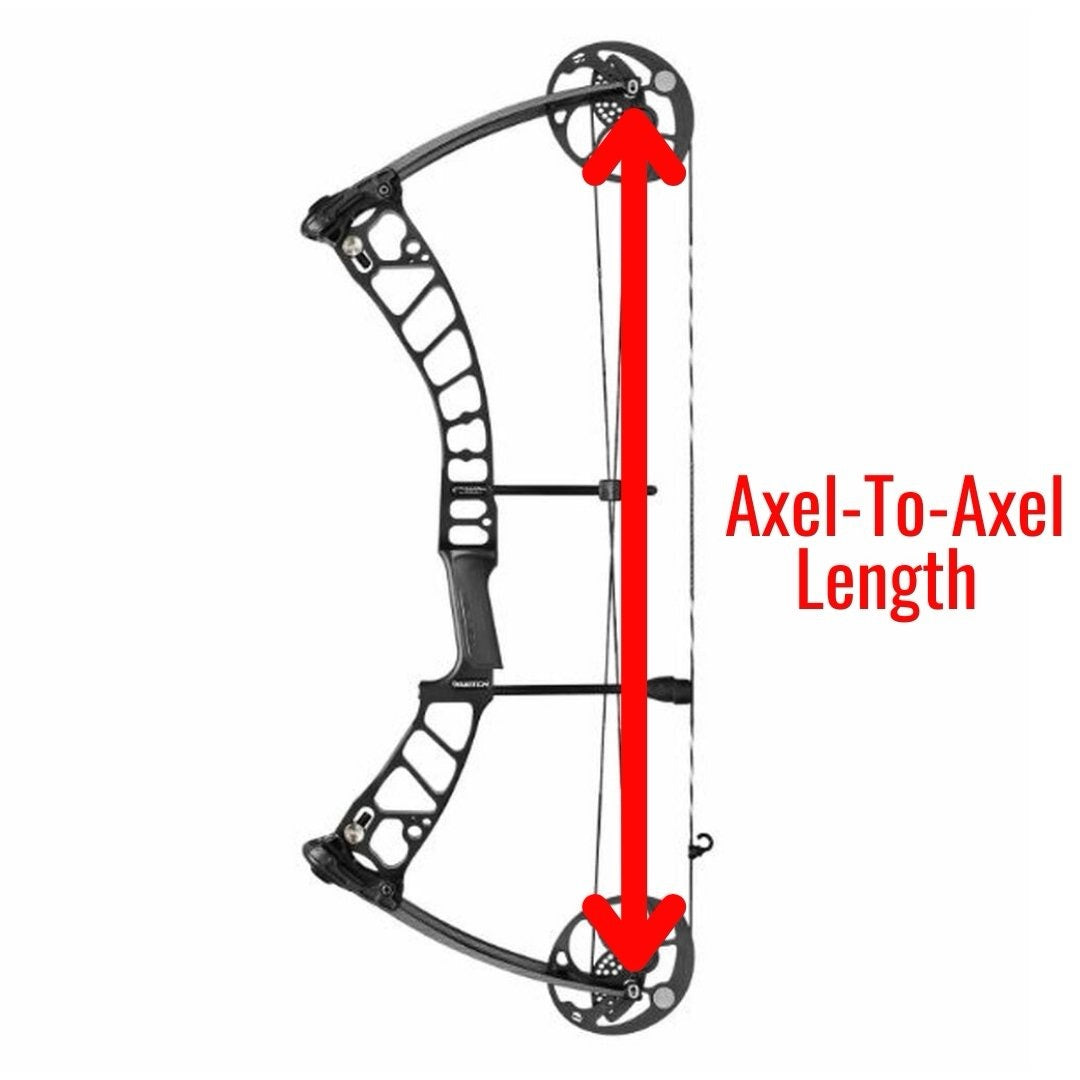
AXLE TO AXLE LENGTH.
Axle to Axle Length, or most times referred to as “ATA” on most spec sheets; is exactly what it implies - it is the length from one cam axle to the other on either end of the bow at the limb tips. This measurement is taken from the “string side” of the bow; or the side that is facing you when you the draw bow. This measurement has an allowable tolerance variation of plus or minus 1/8” for most manufacturers. If this measurement is more than 1/8” shorter than what is specified (which is uncommon) this means your string and cables may be too short; which generally means the bow’s draw weight is higher than specified, which can cause added stress to your limbs resulting in damage over time. If the measurement is more than 1/8” longer than the specified axle to axle measurement, which is much more common; this means your strings and cables are either too long, or they have stretched over time with repeated use. This generally signifies that your bow’s draw weight is lower than what is specified. This issue is easily fixed by adding twists to your cable or cables, depending on the compound bow you own. There are many different types of compound bows, and we will not be going into specifics of tuning each type of bow in this guide.

BRACE HEIGHT.
When a bow is said to be at “brace” this refers to a bow that is not drawn and is in it’s natural static state. To measure your bow’s “brace height”, take a measurement from the deepest part of the grip to the string with a measuring tape, yard stick, or ruler. This measurement, again, should be within 1/8” plus or minus of your bow’s specified brace height for most manufacturers. Just like your bow’s axle to axle length, your measured brace height can give you a good idea of your bow’s performance. Your brace height and your axle to axle actually work hand in hand; if one is out of spec, usually the other is as well. If your brace height is more than 1/8” too short, this usually means your limbs do not have enough tension on them - causing your ATA to be longer and your draw weight to be less than the factory spec. Vice versa; if your brace height is more than 1/8” too long, this usually means your limbs have too much tension - causing your ATA to be shorter and your draw weight to greater than the factory spec.
DRAW WEIGHT.
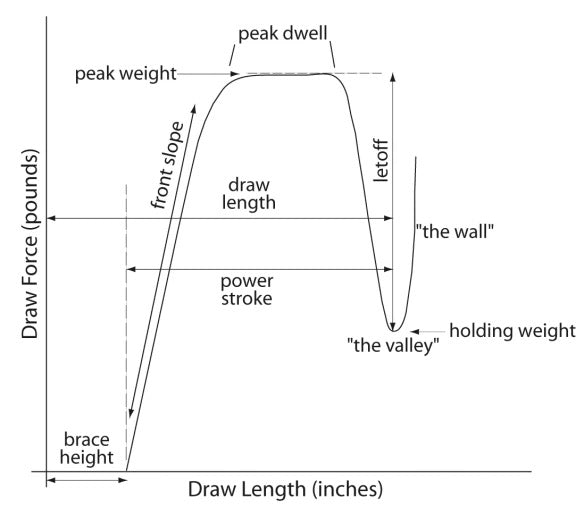
Draw weight, in it’s simplest form, is the maximum weight an archer will be subjected to as they draw their bow back. Unlike recurve bows, where the farther the bow is pulled back, the more load the archer will be under until they get to full draw; which is where they will hit their “peak draw weight” - the compound bow actually hits it’s “peak draw weight” somewhere in the middle of the draw cycle; before dumping off into the “valley”, which is a name for the portion of the draw curve where the archer experiences the “let off” that will have them holding much less holding weight at full draw than they experienced during the draw cycle. This is much easier shown in a graph where the weight the archer is subjected to throughout the draw curve is plotted. Since all bows are designed to hit their “peak draw weight” at different points in the draw curve, depending on what “feel” the engineer is going for in that specific bow - there is no way to know exactly when a bow will hit it’s peak draw weight. The only way to do this would be to draw back a bow in a draw board with a scale, and watch the scale the whole way throughout the draw cycle; taking note of the draw weight the entire time. The highest weight recorded would be your “peak draw weight” or the bow’s “draw weight” for short. A much easier way to do this, is to use crane scales attached to a draw board, or handheld luggage scales that have a “max” or “peak” function. When this function is selected, the scale will only display on the readout the highest weight it has been subjected to throughout the draw cycle; and hold that reading until you have let the bow down and cleared the screen. These scales make measuring your draw weight much easier, and are a must have in every archer’s home pro shop. It is important to make sure your bow is drawing the same amount of weight that is laid out in the specs. This is the weight the bow was engineered and designed to be shot at; and any more or less (within reason) will cause your bow’s efficiency and performance to suffer.
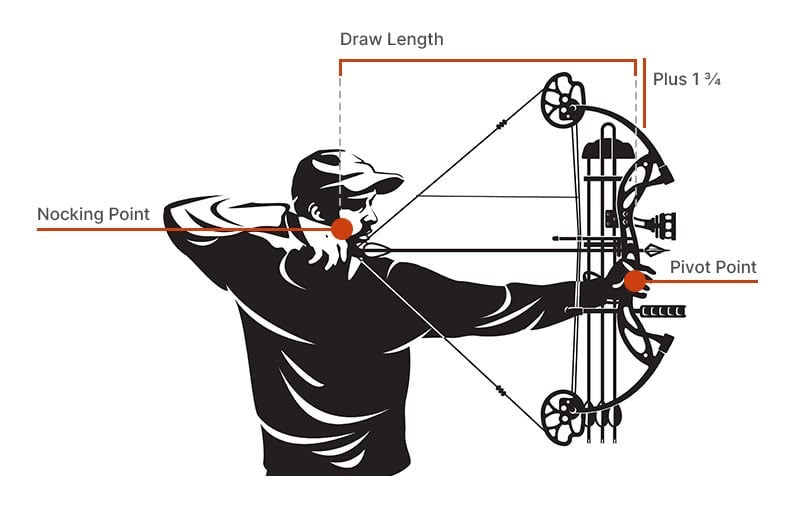
DRAW LENGTH.
Although this isn’t a “bow spec” per say, it is important to know your draw length; how it is measured; and how to determine what draw length your bow is set at if you don’t know.
Your draw length is the measurement between the deepest part of your grip to the farthest point of your string at full draw + 1.75”. For example, if 26.25” is measured between the deepest part of your grip and the farthest point of your string at full draw – you then add 1.75” to that number, resulting in an actual draw length of 28”. The longer your draw length; the longer the arrow is being subjected to the force of your bow string - meaning the arrow will leave the bow with higher kinetic energy and speed. This is crucial information for determining the spine of your arrow in the following step. If you are unsure of what draw length your bow is set at, a quick look at your bow’s cam modules and draw stops will give you all the information you need. Some bows have rotating modules to adjust draw length, and some bows have different modules for each individual draw length. As well, some bows actually have different cams for different draw length ranges; so, a module’s “A” position on one cam may be a different draw length than on another. Consulting your manual and/or doing a google search can tell you this information. Once you know the cam that is on your bow (if the bow model you own has different cams) and the module position/draw stop position your bow is set at; again, a quick look at your manual and/or a google search will tell you what draw length correlates with that bow’s draw stop position or module.
STEP 2: SELECTING THE PROPER SPINED ARROW.
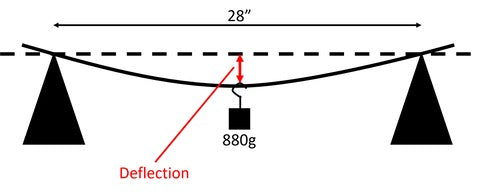
Now that you have found your bow’s specs and your draw length; you have everything you need to figure out the proper arrow spine for your setup. The spine of an arrow is essentially how stiff the arrow is. To explain it in simple terms, the number you see on your shaft is actually a measurement in decimals of an inch of how much the arrow sags when a weight of 1.94lbs is applied to the centre of the shaft while the shaft is being supported at both ends at a span of 28”. So, if you shoot a 500 spine, the arrow has a deflection of 0.500” when the arrow is subjected to a weight of 1.94lbs when being supported at two points 28” apart. If you shoot a 300 spine, it only sagged 0.300”; making it stiffer than the 500 spine. So, the smaller the number, the stiffer the shaft. To find out the proper spined arrow for your setup, you can either consult the arrow brand that you are shooting’s “spine chart”; or use a more advanced spine calculating software like Archer’s Advantage, Pinwheel, etc. to plug that information in. A simple spine chart may just need your draw weight and draw length, whereas the more advanced software will have you input your bow make and model; along with many more specs to give you a much more accurate spine recommendation.
Even when using the most basic spine charts, you will need to know how much weight will be in the front of your arrow. This is referring to the total weight of both your insert and your field point/broadhead, or just the glue in point; depending on what style of arrow you are building. Common total weights range from 100-200 grains in the front on most target and hunting arrows.
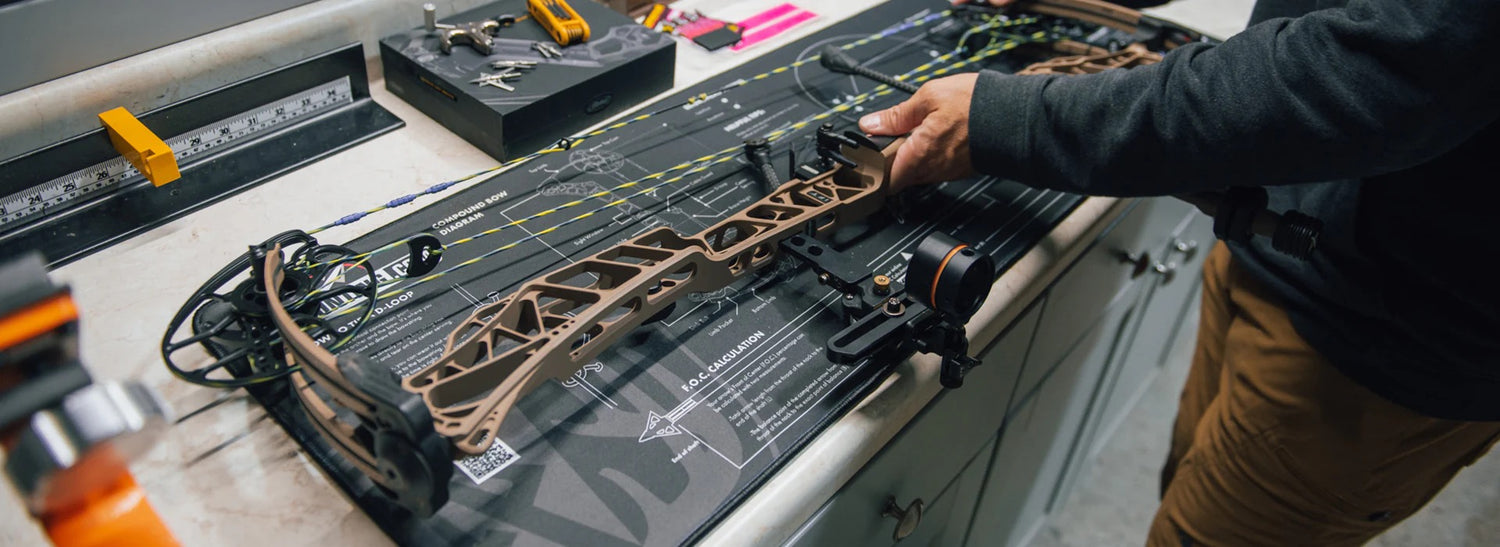
STEP #3: SETTING UP YOUR BOW.
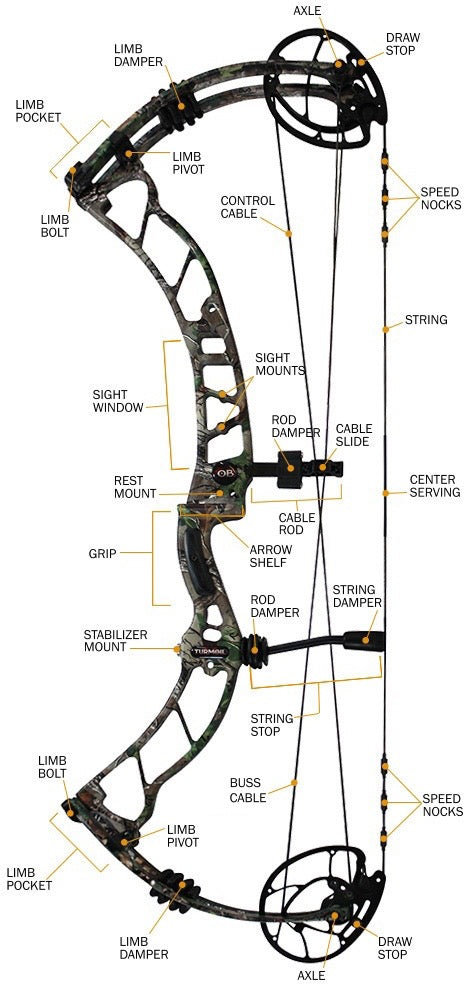
Now that you have checked to make sure that your bow’s specs meet the given tolerances from the manufacturer, and you now have a properly spined arrow selected and built - it is time to “set up” your bow. Bow set up is the step where you get your bow to the point where it can shoot an arrow, and from that point it can then be “tuned” to shoot the arrow straight. The set up stage requires more elaborate and expensive equipment; which may require you to visit your local pro shop. But, for those of you who have the equipment; or are just curious as to what your bow tech is doing behind the counter during this stage - let’s go over the steps to properly setting up your bow. We are going to assume that you already have your arrow rest and bow sight mounted square to the bow’s riser, and a d-loop has yet to be tied on the bow string. You should make sure that there is no excessive cam lean before starting the set-up process and that cam spacers are installed so that your cams are starting in the default position – or in the centre of the axles between the limbs.
SETTING REST HEIGHT, NOCKING POINTS, CENTRE SHOT, AND INSTALLING A PEEP SIGHT.
Put your bow in a bow vice, attach a string level to the bow string, and make sure that your bow string is level on both axis (front to back & side to side). Once this is achieved, cock your arrow rest into the fully “up” position, slide an arrow in and nock it onto the string. We will now set your bow’s “centre shot” - using a ruler, move your arrow rest until the centre of your arrow measures 13/16” off of the riser on most bow brands. Some bow brands may differ, so consult your bow’s manual for what the manufacturer recommends. But, when in doubt, 13/16” is a very good starting place, and most bow brands will not vary far from this. Once this is done, attach an arrow level onto your arrow, and move the arrow rest up or down until the arrow is going through the centre of the Berger hole on your riser (the hole your arrow rest bolts into) or slightly higher. We recommend setting the centre of the arrow up anywhere from centre of the Berger hole, to centring the arrow on the top of the Berger hole. We find running the centre of the arrow through the top of the Berger hole gives more clearance from the shelf of your riser in the situation where your bow tunes “nock low”; where you’ll find that you’ll have to lower your arrow rest in order to get a perfectly tuned “bullet hole” though paper. But, anywhere in the range described is perfectly fine; and this is all personal preference.
Once you have set your bow’s centre shot, and the initial height of the arrow rest; you are now ready to tie in your “nock sets” for your “nocking point”. Move the arrow’s nock up or down the string until the arrow level reads perfectly level with the bubble is perfectly between the lines. If your bow is a “single cam”, then you will want to have your nock end slightly higher, or about 1/8” high from level to achieve perfect “nock travel”. You will now tie nock sets above and below your nock, leaving 2 “serving widths” of play between the top of your nock and the top nock set. This will prevent nock pinch at full draw. Now, you may tie a d-loop around the nock sets. We will not be going into how to tie in nock sets, d-loops, or peep sights; as there are many ways to achieve this and it is personal preference. YouTube is a great resource for learning how to tie in any of these accessories on your bow if you happen to attempt this by yourself. After the d-loop is installed, you can go ahead and remove your bow from the bow vice and put it straight into your bow press to install your peep sight. Once tension has been taken off the bow string, install your peep sight in roughly the location it will be set at. A rough height of 6" from the centre of your nocking point to the centre of your peep sight while the bow is at brace is usually a good starting point. Actual peep height will vary upon many factors like string angle at full draw; the archer's anchor point and body physiology; etc. - which can be fine tuned after the bow setup is complete. We will not be going into the specifics of fine tuning peep height in this guide, but there is lots of good information online where you can dive deeper into this topic. After the peep is installed in the string; tie a temporary knot around it using serving to prevent the peep from launching out of your bow in the steps to come. Some may wait until later in the process to install their peep, but this is incorrect. It is critical to install the peep sight before checking "cam timing" and "cam synchronization", and not after, as installing the peep sight causes a slight variation in the bow string length above your d-loop. If a peep sight is installed after the cam synchronization is set, it can affect the accuracy of your cam synchronization of your top cam to your lower cam; which ultimately affects nock travel and bow feel at full draw.
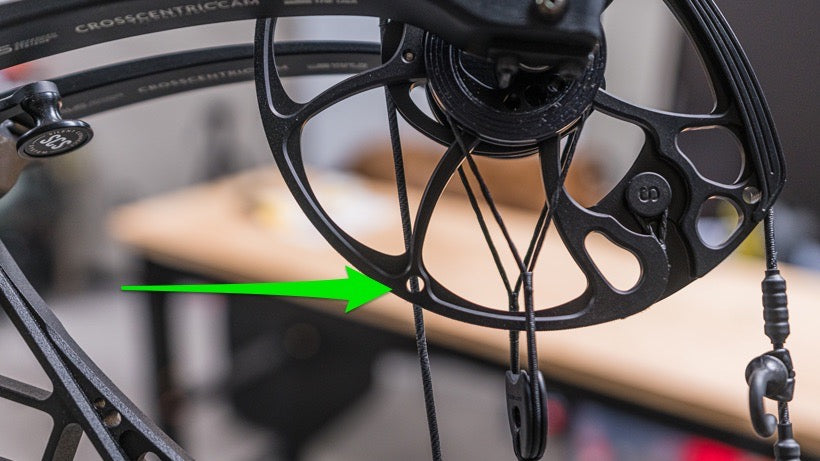
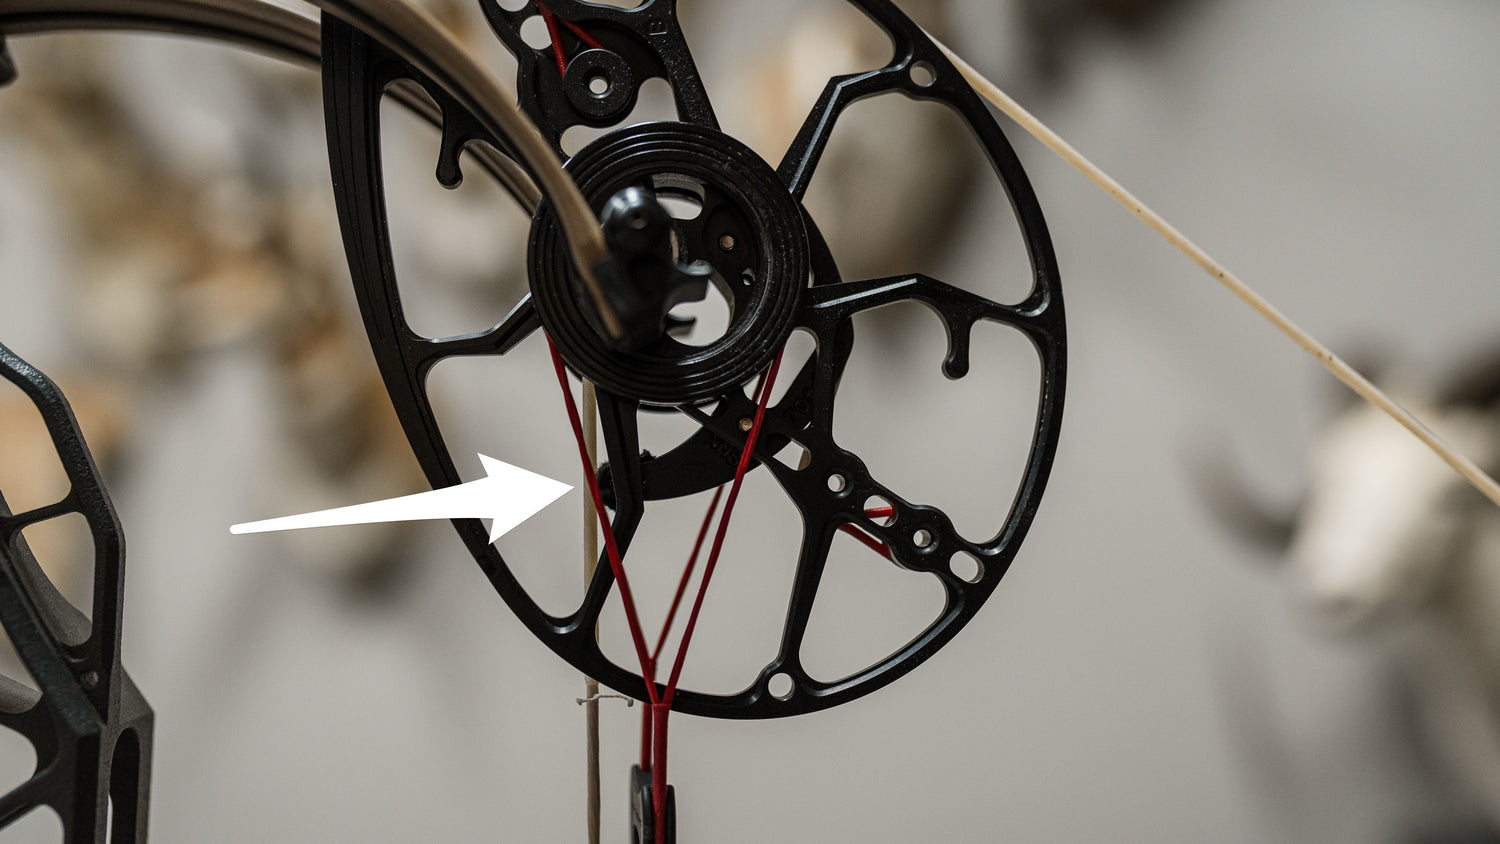
CHECKING / SETTING CAM TIMING.
The next step in the setup process is making sure your cams are “in time” which applies to both "single cam" bows and “dual cam” bows. Most bows have “timing marks” on the cam(s) that are usually in the form of dot or a hole on the cam that is meant to align with the cables on the bow. Cam timing is done when the bow is not at full draw, or “at brace”. It is making sure that your cam(s) are starting in the position the manufacturer designed them too. If you look at your cam(s) like a clock, and draw a line facing 12:00, if your cam was to start at brace in either the 1:00 or the 11:00 position; the cam and the modules are not going to be contacting the string, or producing the proper draw cycle the way the manufacturer engineered it to. This will cause loss of efficiency in your bow. It is important to have your timing set perfectly in the set-up phase. For single cam bows, the timing stage is now complete - but, for dual cam bows; the next step will be to check the bow’s “cam synchronization”.
CHECKING / SETTING CAM SYNCHRONIZATION.
In this next step, we will be checking your dual cam bow’s cam “synchronization”, which requires the use of a draw board to bring your bow to full draw. Load your bow into the draw board and pull back the string until you your draw stops are approximately 1/16” away from your cables or limbs. Inspect the top and bottom cam’s draw stops - if one is at 1/16”, and the other is more than that; then you will need to make adjustments to your cable lengths by adding twists to your cables to bring the cams “in synch” with each other. If you find that a half a twist is too much adjustment, and you need to make a finer adjustment; then you can either add equal twists to the yokes on either side of the cam (on bows with fixed yokes); or add in small pieces of d-loop material into the cable that needs adjusting, to micro adjust the cams position when half a twist in the cables is too much. Make sure that during this adjustment of the cam synchronization, that you don’t twist up the cables to the point where it takes your bow out of time again. When you let your bow down, and take it out of the draw board; check it again at brace to ensure that the cam’s timing marks are still within the allowable tolerance of the cables. The cables do not always need to be perfectly centred in the timing marks, but as long as all the specs previously mentioned are bang on, and the cams are synchronized; then it is okay for the cables to be “touching” the timing marks on one side or the other. It is okay if the cables aren’t perfectly centred in the timing marks, but make sure they are close.
Now that you’ve set your centre shot; arrow rest height; tied nock sets; tied a d-loop; timed and synchronized cams depending on the type of bow you own - your bow is now fully setup and ready for the tuning process!
STEP #4: TUNING YOUR BOW.
Like mentioned earlier, there are “many ways to skin a cat” when it comes to tuning a bow. What one archer may swear by, another archer may disagree - but, the tuning methods we are about to lay out are what we feel are the fundamentals of tuning. We suggest starting out with this process, and if you decide to take your tuning up and above the steps mentioned - by all means, we support your travel down the deep rabbit hole of archery tuning and tinkering! We’ve been all the way down this deep dark hole ourselves - but, we always come back to these basic steps as the easiest way to get great arrow flight out of your bow.
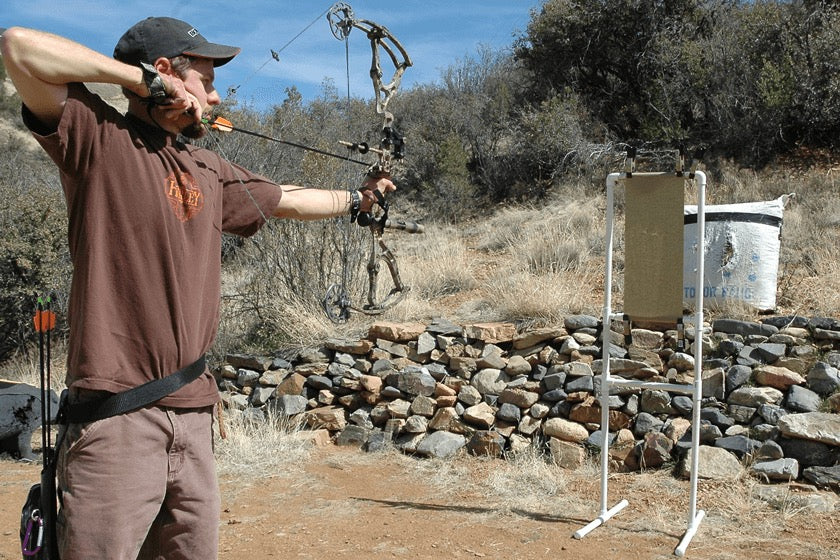
PAPER TUNING.
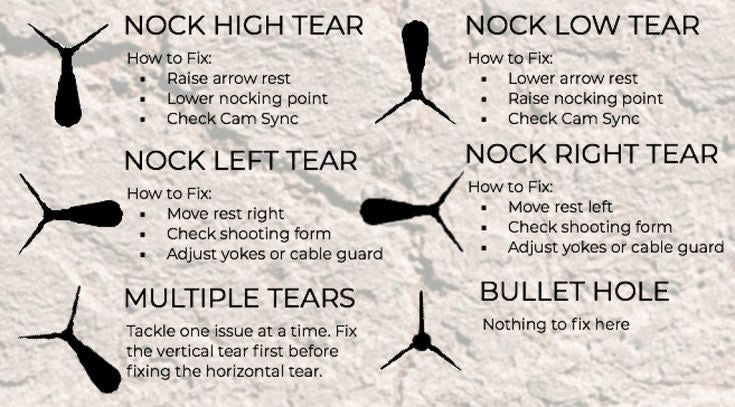
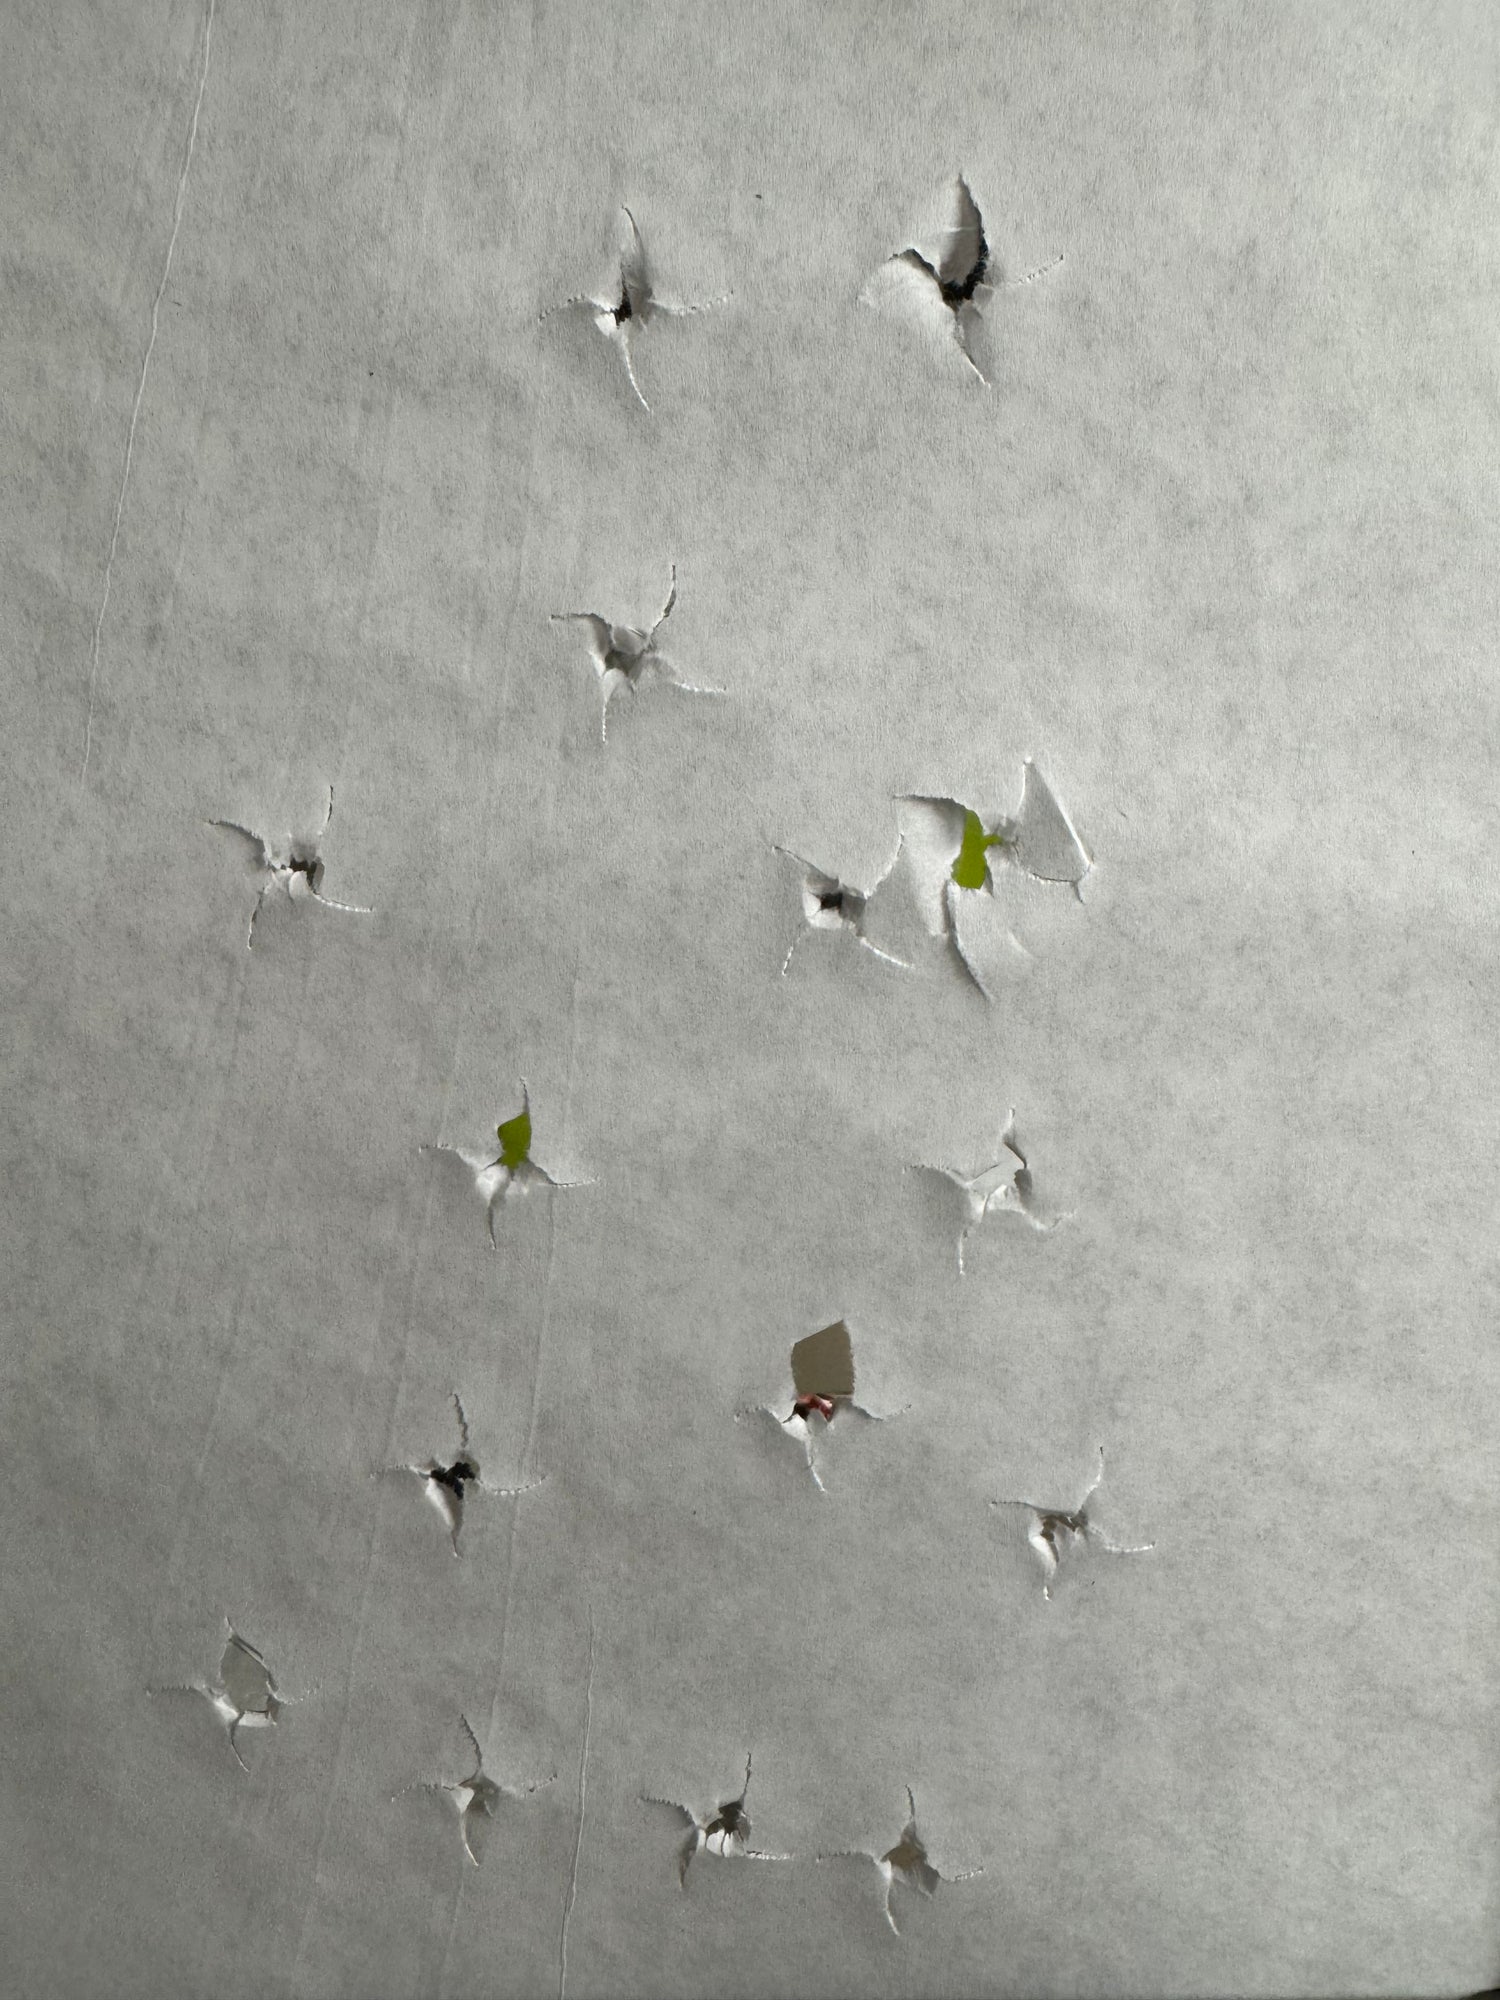
Now that we have a fully setup bow, it is time to “Paper Tune” your setup. This is done by standing 3-5 yards back from a piece of taught paper at an elevation that is level with your bow at full draw, and shooting an arrow through the paper. The goal is to achieve a perfect “bullet hole” through the paper where the point of your arrow and the rear nock and fletchings all fly through the same hole. A “Paper Tear” is when the point and nock do not fly through the same hole in the paper, therefore creating a tear across the paper. Adjustments can be made to your bow to take it from shooting a “Paper Tear” to a “Bullet Hole”. Use only field points on the tip of your arrow for this step in the tuning process. To begin Paper Tuning, you can make a very basic paper tuner by taking a cardboard box, printer paper, and cut a hole in the cardboard box approximately 1” smaller than the piece of printer paper. Tape the paper onto the box, covering the hole and making sure the paper is taught. Now, setup the box at the elevation described above with a target behind it to stop the arrow. Shoot through the paper and read the results of the Paper Tear you have now made when your arrow passed through. You will now use and read these Paper Tears to determine what adjustments are needed to your bow to get perfect arrow flight. Paper tuning charts can be found easily online detailing what adjustments need to be made depending on which Paper Tear you observe, but an easy way to remember which adjustment to make in each situation is:
⁃ Horizontal Paper Tears: Chase the arrow point with your rest. Chase the arrow fletching with your yokes/cams.
⁃ Vertical Paper Tears: Chase the arrow fletching with your rest. Chase the arrow point with your nocking point
For Horizontal Paper Tears, the preferred method to alleviate left/right tears is to adjust cam spacers or twist up left/right yokes to move the bow string into alignment to where the bow will shoot the arrow perfectly straight. This method should be used for course tuning, and only when fine tuning should the rest be moved out of centre shot which was established during the setup stage. If any more than 1/8” adjustment on the arrow rest is needed to shoot a “Bullet Hole”, then that is considered a course adjustment; and at that point, the rest should be moved back to centre shot, and Cam Spacer and Yokes should be adjusted to correct the paper tear. Some bows may not have the means to adjust Cam Spacers or Yokes, so you may not have a choice but to move the arrow rest more than 1/8” out of Centre Shot, which in that case is deemed acceptable. The goal no matter what is to achieve a bullet hole. Most times this is done by using a combination of adjusting the Cams/Yokes for course adjustments and the Arrow Rest for fine adjustments to achieve a perfect bullet hole - although, some newer bow models from the top brands are coming out with technology that allows you to fine tune the cams, yokes, and even limbs to achieve a perfect bullet hole without ever moving the arrow rest. So research your bow online to see what tuning methods are available on your current model, so you can go about the most efficient way to tune your setup to achieve a perfect bullet hole. If you have issues obtaining a perfect bullet after maxing out the course adjustment in your cams; and you are forced to move your arrow rest well outside the allowable 1/8” tolerance for centre shot - then it is very possible that A: You need to readdress your bow form and grip And/Or B: Your limbs have been installed in the wrong order and you may need to go to your local bow shop to move your limbs around, or even worst cases; get a new set of limbs that will work better with your setup. Always address this issue using that ladder. We should always look at ourselves before blaming the equipment; but, sometimes after everything else is addressed, the equipment can be to blame.
PSA: ONLY YOU CAN PAPER TUNE YOUR BOW!
Some shops will offer to Paper Tune your bow for you - this is a waste of time on their part and a waste of money on yours. Only you can Paper Tune your own bow! Different body physiology, bow form/bow grip, and even different release aids can cause your bow to tune differently. Only you can tune your bow; and when your bow is tuned, it is tuned specifically for you! That is one of the awesome parts of archery – your bow is setup and tuned custom to you!
NOCK TUNING / INDEXING.
“Nock Tuning” is a slightly more advanced tuning method for Intermediate to advanced archers. It requires very repeatable form; so lots of quality reps behind your bow is a must before attempting this tuning method. Nock Tuning is a form of tuning that is done after the basic process of Paper Tuning your bow and arrow setup. So instead of only shooting one arrow to achieve a bullet hole, every arrow you plan to practice with or carry in your quiver is shot through paper to make sure they all are all being shot out of the bow consistently. You will work with one arrow at a time, shooting it through paper in every nock position available based upon the configuration of your fletchings – 3 fletch will have 3 nock positions available and 4 fletch will have 4 nock positions available, until you shoot a perfect bullet hole. If you are lucky, you will shoot each arrow through paper, and they will all create a perfect bullet hole in paper; meaning you are done the nock tuning process and no adjustments are needed. But, it can be common for you to get a slight variance on the odd arrow, which can be cleaned up to create a perfect bullet hole with a turn or two of the nock position. In extreme cases, if you cannot create a bullet hole with the majority of your arrows, you may have done your initial paper tune with an outlier arrow, or one that requires nock tuning to bring it in line with the others. In that case, shoot every arrow through paper again, choosing the nock position that gives the most consistent tear amongst your batch of arrows – then tune your bow again to jive with the majority of your batch. If you find one arrow is stubborn and will not tune with the rest of them no matter what position you turn the nock, cull that arrow from the batch and only use it in situations when accuracy is not critical; like blank bailing.
For most target shooters, a paper tuned bow will give good arrow flight and accuracy. So after achieving a perfect bullet hole, if you are not planning to hunt with your bow setup - you are ready to hit the range and stack up the reps. Of course, we’d get some backlash if we didn’t mention that there are more advanced steps that can be taken up and above paper tuning to gain even better accuracy and forgiveness. But, basic paper tuning will have your bow setup shooting an arrow straight out of the bow and impacting behind the pin at all yardages. This is the goal of this guide, so we will not be covering any other tuning methods for target archers, and those that do not plan on hunting with broadhead tipped arrows.
If you plan on bowhunting with your bow setup, you have one last step before removing field points; screwing on broadheads; and heading out in hopes of releasing an arrow at a live animal. You will need to “Broadhead Tune”.
BROADHEAD TUNING.
Broadhead tuning is a crucial step when choosing to tip your arrow with a broadhead that plains much more in the air compared to your standard aerodynamic field tip. Even when a bow setup is paper tuned with a field tip, the fletchings may be correcting the arrow’s flight slightly before impacting the paper; which can hide slight tuning or form issues. When a broadhead tipped arrow is shot out of a bow, the added surface area on the front of the arrow can now start to negate the surface area of the fletching at the rear of the arrow; causing the flight correction to happen slower, therefore magnifying any slight tuning or form issues. The goal should be to achieve the same arrow flight and point of impact with your broadhead tipped arrows as you do with your field point tipped arrows out to, and even beyond, your maximum effective hunting range. The farther out you can get your broadheads and field tips to group, the more dialed in your tune will be at closer distances. There is a point where it is not possible to have field points and broadheads to hit together, just because the drag coefficient of each head is different; but, this does not usually happen until extreme ranges are being reached - much farther than most hunters are shooting at live animals.
To begin broadhead tuning, start with a paper tuned bow that you personally have shot a bullet hole through paper with, and have sighted in using your field points. Grab two field point tipped arrows; unscrew the field tip off one of the arrows; install your broadhead of choice; and start at a very safe distance from a foam target capable of being shot with broadheads. Shoot your broadhead tipped arrow at the dot in the centre and observe your results. It is very important to start at safe distance for the size of target you are using when shooting your broadheads for the first time. A broadhead can be very unpredictable out of a poorly tuned bow, so it is always important to use caution when shooting them for the first time. If you hit close to the centre with your broadhead tipped arrow, or lucky enough in the centre; move back to 20 yards and proceed to shoot your broadhead tipped arrow again. After you have shot your broadhead tipped arrow, proceed to shoot your field point tipped arrow at the same dot. Once you have shot both your broadhead and field point tipped arrows; observe your results in the target. It is usually good practice to shoot at least once more, just to verify your results were not a fluke; but if you are lucky enough to get the same point of impact 2-3 times in a row - then you are ready to move back another 10 yards and repeat the process again. For those of us that are not so lucky, and we find our broadhead and field point tipped arrows do not have the same point of impact; or as you move back in 10 yard increments, your broadhead and field point tipped arrows start to drift away from each other - here is the proper way to correct that. Using the same logic as we used to Paper Tune - Broadhead Tuning is very similar. We are going to move our rest; but, instead of shrinking a paper tear, and eventually getting a bullet hole, we are going to shoot and move our rest until the gap between our two arrows shrink and we achieve the same point of impact between our broadheads and field points. Keep in mind, while moving our arrow rest to broadhead tune; your field point and broadhead will not hit the centre dot on the target anymore - even though this is where you should be aiming for every shot. You will keep aiming and shooting at the middle dot, even though this may not be where your arrows are hitting - we are only concerned about our field point and broadhead tipped arrows grouping together; not where they are impacting on the target. If your rest needs so much adjustment that your arrows seem like they may miss the target; aim at a dot farther in the opposite direction, or adjust your sight so you are hitting closer to the centre again, and keep tuning (Move sight towards the direction you are hitting - ex. Missing dot to the left, move sight towards the left). Once you are satisfied with your tuning, and you have the same impact point between your two arrows; you can now sight in your bow again so both broadheads and field points hit the centre dot again that you are aiming at. Below is another easy way to remember what rest adjustments are needed for the different results you will see on the target face:
⁃ Horizontal Broadhead Tuning: Move the arrow rest towards the broadhead tipped arrow. (Ex. Field Point arrow hits the centre and the Broadhead arrow hits to the right. Move arrow rest to the right and shoot again. Repeat this until the broadhead and field point tipped arrows group together; then resight in.)
⁃ Vertical Broadhead Tuning: Move the arrow rest towards the field point tipped arrow. (Ex. Field Point arrow hits the centre dot and the Broadhead Arrow hits high. Move the arrow rest down and shoot again. Repeat this until the broadhead and field point tipped arrows group together; then resight in.)
AN IMPORTANT POINT TO NOTE:
You can only broadhead tune out to your maximum effective range, and you cannot expect your broadhead and field point groups to be better than your strictly field point groups. For example, if you cannot group field point tipped arrows into a 2” group at 40 yards - you cannot expect for your field point and broadhead tipped arrows to group within 2” at 40 yards. It is important to be honest with yourself and your skill level during this tuning process, and not to expect better results from your broadhead tipped arrows than you are actually capable of shooting with your normal field tipped arrows.
ANOTHER IMPORTANT POINT TO NOTE:
Generally speaking, mechanical broadheads are much more “forgiving” than fixed blades in flight. This is why one must always tune their setup with a fixed blade broadhead first, even if they plan to hunt with a mechanical broadhead. When we refer to a part of a bow and arrow setup being “forgiving”, we are referring to a part of the setup that forgives mistakes - or hides them better than other gear options. If you make a mistake, a forgiving bow, arrow, or broadhead will punish you less down range; making you miss your mark by less. Mechanicals vs Fixed broadheads is a highly controversial subject that we don’t want to pick sides on, but I think all bowhunters can agree that getting a mechanical broadhead and a field point to group together in most instances is much easier than with a fixed blade broadhead. Long story short, mechanical broadheads can hide flaws in your tune that are robbing energy from your setup. Even though the mechanical broadhead tipped arrow is hitting with your field points - it might not be coming out of your bow perfectly straight initially. The more your fletchings have to work to get your arrow flying straight and true, the more energy they are sucking from your setup to do so. If you can get your arrow coming straight out of the bow at launch, then all your fletchings have to do is maintain that perfect arrow flight all the way down range to the target - which requires much less work and energy loss. For example, two cars drag racing may both make it to the finish line; but if one takes off the starting line and spins it’s tires and fish tails, but the other has a clean jump off the line - which one is going to finish faster? The car with the more efficient jump off the line. This is a great reason to tune your bowhunting setup with fixed blades, even though you plan to hunt with mechanicals. We also then too suggest that you sacrifice one mechanical; use some super glue to glue the blades shut if it doesn’t have a “practise mode” to keep the blades from deploying; and shoot it with your field points as well - just to ensure the mechanical has the same point of impact as your fixed blades and field points. Almost always they will; and if they don’t, it’s likely at longer range and the adjustments are small.